Introduction
What is DXSpotter Pro?
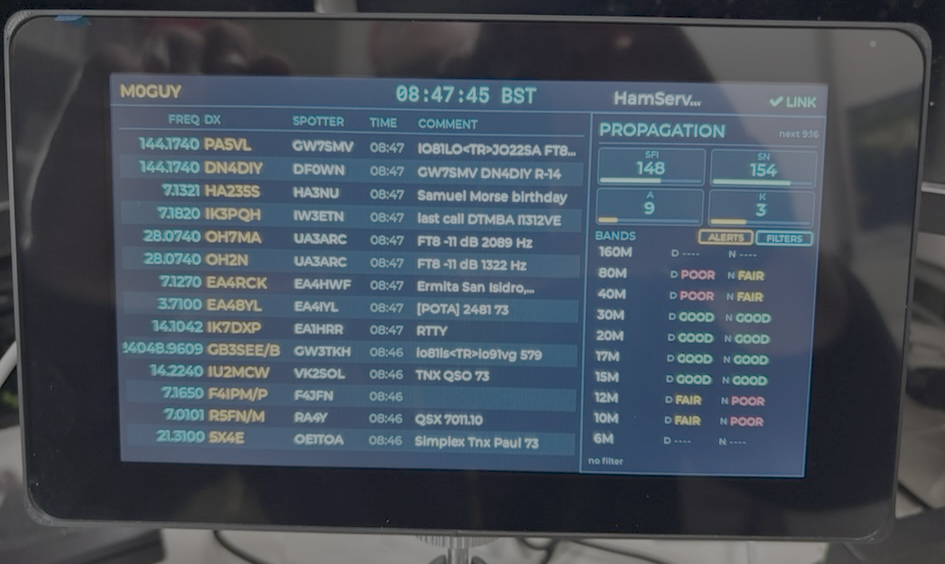
DXSpotter Pro is the flagship member of the TopBytes DX Spotter family. Where the original DX Spotter offers a compact 256x64 OLED at-a-glance display, DXSpotter Pro replaces the small OLED with a 7-inch, full-colour 800x480 LCD with capacitive touch — a complete touch-driven dashboard for DX cluster monitoring, propagation awareness, and DX alerting.
Like the original, DXSpotter Pro connects over WiFi to standard DX cluster servers via Telnet and shows real-time amateur radio spot information. It then goes further: HamQSL solar / propagation data — served from a cached TopBytes feed so the device never has to hit the upstream service directly — is fetched and rendered alongside the spot list, and the entire device can be configured directly from the screen — no laptop, no phone, no captive portal required (although a web portal is still provided for those who prefer one).
Key Features
7-inch Colour Touchscreen
800 x 480 pixel full-colour LCD with anti-glare finish
Capacitive multi-touch panel — drives the entire UI
Bright enough to read from across the shack
Wide viewing angle suitable for desk or wall mounting
1/4"-20 tripod thread on the bottom edge for camera-tripod or articulated-arm mounting
Touch-Driven UI
On-device first-run wizard — no laptop required
Tap the callsign to edit it; tap LINK for live network info; long-press LINK to manage WiFi networks; long-press the clock to change the timezone
Tap any spot row to open a full detail modal with the complete comment text
Tap the cluster name to switch DX cluster servers
Tap a band in the propagation panel to filter to that band instantly
Tap MODE to filter by CW, SSB, FT8, FT4, RTTY, PSK, or one of your own custom presets
Propagation Panel
HamQSL solar data, served from a cached TopBytes feed and refreshed in the background
SFI (Solar Flux Index), SN (Sunspot Number), A-index, K-index displayed with coloured gauges
Per-band day / night condition indicators (160M through 6M)
Tap a band row to apply a band filter to the current cluster session
Solar and propagation data is provided by HamQSL.com (Paul L Herrman, N0NBH).
DX Alerts
Up to 10 callsign or prefix entries (e.g.
3B7matches any 3B7* station)Matching spots are highlighted in amber on the spot list
Auto-popup modal on alert match with full spot details
Configurable auto-dismiss timer (default 60 seconds, 0 = manual dismiss)
Manage alerts directly on screen (ALERTS button) or via the web portal
Operator Lookup (QRZ.com)
Optional QRZ.com sign-in adds each operator's name, QTH, grid square, and country to the spot detail and alert pop-ups
Looked up live in the background and cached; requires a paid QRZ XML subscription
Configured from the web portal; off by default
Dual Configuration: Touch and Web
Configure WiFi, callsign, cluster, filters and alerts directly on the touchscreen
Or use the built-in web portal on port 80 — same form-driven layout familiar from the classic DX Spotter
Optional 180° screen rotation for upside-down mounting (LINK modal or web portal)
Settings stored in NVS and survive reboots and firmware updates
WiFi Connectivity
Store up to 5 WiFi network credentials with priority ordering
Automatic scan on boot — connects to the highest-priority network in range
AP-mode fallback after repeated failures, with on-screen QR codes for easy setup from a phone
mDNS/Bonjour support — device discoverable as
<devicename>.local
DX Cluster Integration
Real-time Telnet connection to DX cluster networks
Composable filter system: independent band filter (slot 0) AND mode filter (slot 1)
Five built-in cluster presets, plus up to 5 user-defined custom clusters
Two built-in filter presets, plus up to 5 user-defined custom filters
Status Bar
Persistent at the top of the screen
Your callsign (left), local clock (centre), cluster name and link state (right)
Tappable elements: callsign opens an on-screen keyboard, LINK opens the network details modal
Over-The-Air Updates
Automatic hourly check against the TopBytes update service
Released firmware is downloaded and installed automatically
On-screen progress bar with status messages during the update
Manual
otacommand available via the serial CLI
How DXSpotter Pro Compares to the Classic DX Spotter
Feature |
DX Spotter (Classic) |
DXSpotter Pro |
|---|---|---|
Display |
256x64 yellow OLED |
7-inch 800x480 colour LCD |
Input |
Web portal only |
Capacitive touch + web portal |
Spot view |
One spot at a time, scrolling |
Multi-row list with live updates |
Spot detail |
Inline scrolling comment |
Full detail modal on tap |
Propagation data |
Not shown |
Live HamQSL panel (SFI/SN/A/K + per-band) |
Alerts |
None |
Up to 10 callsigns/prefixes with popup |
First-run setup |
Connect to DXCluster AP, browser |
On-screen wizard (or AP fallback) |
WiFi management |
Web portal |
Web portal or long-press LINK on screen |
Power |
USB-C |
USB-C |
Software Requirements
Either a touch screen interaction directly with the device, or a web browser on a computer / tablet / phone for web-based configuration
Access to a DX cluster server (five public clusters are pre-configured)
Optional: internet access for HamQSL propagation data and OTA updates
Amateur Radio Requirements
A valid amateur radio callsign
Basic understanding of DX cluster operation
Knowledge of the bands you wish to monitor
How It Works
DXSpotter Pro operates in five concurrent stages:
Power On: The 7-inch LCD lights up with the DXSpotter Pro splash screen. The device loads stored configuration from non-volatile storage.
Setup or Connect: If no WiFi or callsign is configured, the on-screen wizard opens automatically. Otherwise the device joins your highest-priority WiFi network. If WiFi keeps failing, the device falls back to an AP setup screen with QR codes.
Cluster Login: Once online, DXSpotter Pro connects via Telnet to your selected DX cluster server, sends your callsign, and applies any band/mode filter you've configured.
Live Display: DX spots stream in and populate the multi-row spot list. The propagation panel begins fetching HamQSL data in the background. The status bar shows your callsign, local time, and cluster name.
Interaction: Tap anywhere on the screen to drill in — open a spot, switch clusters, change filters, edit alerts, or view network details. Configuration changes apply immediately.
Typical Use Cases
Desktop Shack Monitor
The 7-inch screen is sized for desk use — large enough to read every spot, small enough to sit beside a transceiver without dominating the desk.
Contest and DXpedition Monitoring
Add the rare prefixes you're chasing as alerts. The screen highlights matching spots in amber and pops up a full detail modal when one arrives, so you don't miss the contact.
Propagation-Aware Operating
Tap a band in the propagation panel to see who's active there right now. Per-band day/night indicators show at a glance which bands are open.
Club and Field Day Stations
Visible from across the room, no laptop required. The on-screen wizard means anyone in the club can set it up — no captive-portal walkthrough needed.
Design Philosophy
DXSpotter Pro was designed with these principles:
Touch-First
Every common task should be doable on the screen. The web portal exists for power users and bulk edits, but the device must work out of the box with no other equipment beyond a USB-C power supply.
Information Density
The 7-inch screen is large enough to show many spots at once, plus a propagation snapshot, plus the status bar — all visible together so the operator gets the full picture without paging or scrolling.
Reliability
The device should automatically recover from network drops, switch between configured WiFi networks, fall back to AP mode for re-setup, and keep the cluster connection alive without user intervention.
Discoverability
Anything that's tappable should be obviously tappable. Modals close where you'd expect (X button or background tap). Long-press is reserved for less-common destructive or advanced actions.
Openness
The device speaks standard DX cluster Telnet and standard HamQSL XML. There's no proprietary cloud lock-in — the only TopBytes service it talks to is the OTA update server, and only to check for new firmware.
What's Next?
Now you understand what DXSpotter Pro is and what it does, proceed to Getting Started to power it on and run the first-time setup.