Getting Started
This section walks you through the first-time setup of your DXSpotter Pro device. The whole process happens directly on the touchscreen — no laptop or phone is required for a basic setup.
Unboxing and First Power-On
What's in the Box
Your DXSpotter Pro package should contain:
DXSpotter Pro device
USB-C power cable
Initial Power-Up
Connect the USB-C cable to the DXSpotter Pro's USB-C port
Connect the other end to a USB power source (5 V wall adapter, computer, or quality power bank)
The 7-inch LCD will light up and show the DXSpotter Pro splash screen
Note
Use a quality 5 V USB-C power supply rated at 1 A or more. Insufficient power may cause boot loops or display instability.
First Boot Sequence
When DXSpotter Pro powers on for the first time (or after a factory reset), the following happens:
Splash Screen: The DXSpotter Pro logo and version number appear briefly.
Configuration Check: The device looks for stored WiFi credentials and a configured callsign in non-volatile storage.
Wizard Launch: Because nothing has been configured yet, the on-screen first-run wizard opens automatically and takes over the screen.
The On-Screen First-Run Wizard
The wizard is the simplest way to get DXSpotter Pro online. It guides you through two steps and saves your settings as you go.
Wizard Layout

The wizard fills the entire 800x480 screen and shows:
A "Welcome to DXSpotter Pro" header
A short reassuring subtitle: "Let's get you set up. You'll need a WiFi network and your callsign."
Step 1 — WiFi network with a CONFIGURE button on the right
Step 2 — Callsign with a SET button on the right
A DONE button at the bottom-right (greyed out until both steps are complete)
Step 1: WiFi Network
Tap the CONFIGURE button on the WiFi row.
The wizard hides itself and the WiFi picker opens. The picker scans for nearby 2.4 GHz networks and lists them with signal-strength indicators.
Choose your network
Tap the SSID of your home or shack WiFi from the list.
Note
DXSpotter Pro does not support 5 GHz networks. Make sure your router has 2.4 GHz enabled.
Enter the password
An on-screen keyboard appears. Type your WiFi password using the touchscreen.
Tap letters to type them
Tap the shift / symbol keys for capital letters and special characters
Tap OK when done, or Cancel to back out
Saved
The wizard returns and the WiFi row now shows your SSID in the accent colour. The device begins attempting to connect in the background.
If you cancel the WiFi picker, the wizard simply reopens with no change made.
Step 2: Callsign
Tap the SET button on the Callsign row.
The on-screen keyboard opens with a blank input field, capped at 11 characters.
Type your callsign
Use the touch keyboard to enter your amateur radio callsign (e.g.
K3ABC,G4XYZ,VK2ABC).Tap OK
Your callsign is automatically converted to upper-case and saved. The wizard returns and the Callsign row now shows your call in the accent colour.
Important
You must enter a valid callsign. The device will not attempt to connect to the cluster while the callsign is blank or set to NOCALL.
Completing Setup
Once both rows show values:
The DONE button at the bottom-right becomes active (highlighted in the accent colour)
Tap DONE to dismiss the wizard
DXSpotter Pro now drops into its main screen and starts:
Joining the WiFi network you configured
Synchronising the clock via NTP
Connecting to the default DX cluster server
Fetching cached HamQSL propagation data in the background
Within 10 to 40 seconds you should see your first spots appearing in the spot list.
What If the WiFi Step Fails?
If DXSpotter Pro can't connect to the WiFi network you configured (wrong password, network out of range, etc.), it retries a few times then falls back to AP setup mode. The screen switches to a dedicated setup screen showing two QR codes:
Left QR: Join the device's setup access point (
DXSpotter Pro Setup)Right QR: Open the configuration page (
http://192.168.4.1/)
Both URLs are shown as text below the QR codes in case your camera can't read them.
(screenshot placeholder: AP setup screen with QR codes)
To recover:
Scan the left QR with your phone — it joins the
DXSpotter Pro Setupopen networkScan the right QR — your phone opens the configuration page
Use the web form to correct the WiFi password or pick a different network
Save — the device reboots and tries again
The AP-mode screen is also useful if you ever need to re-configure WiFi without using the touchscreen.
The Main Screen at a Glance
After the wizard completes, the main screen has three regions:
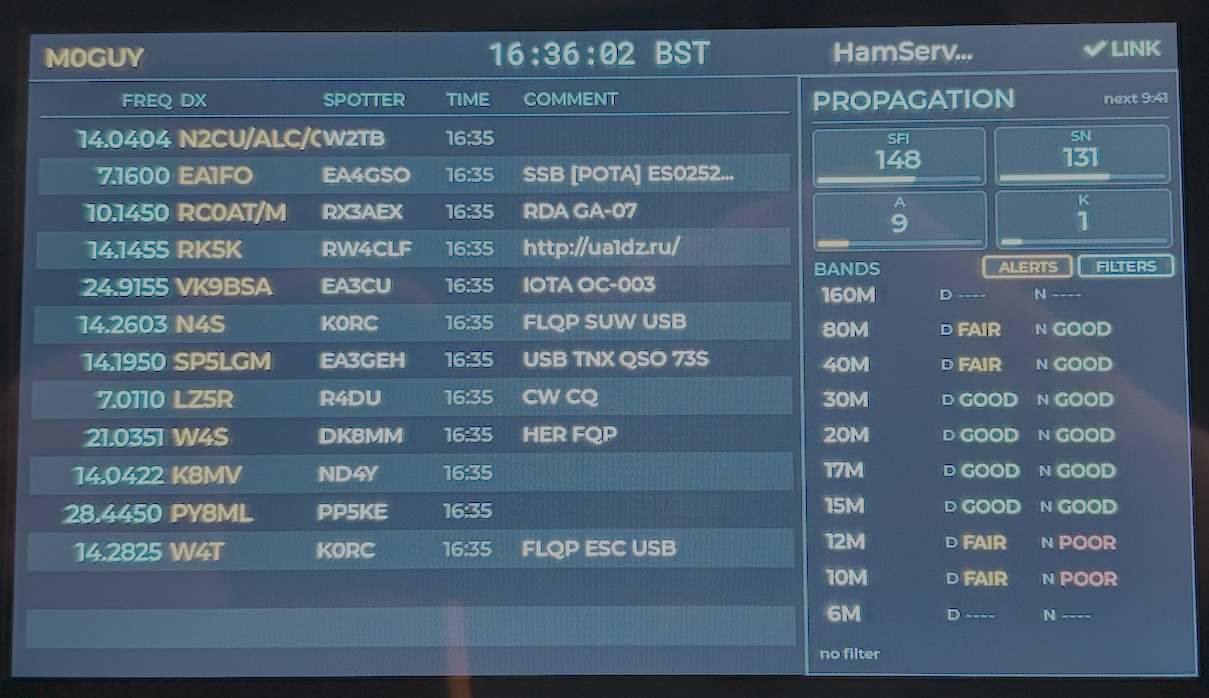
Status Bar (top, full width, 36 px tall)
Left: your callsign — tap to edit
Centre: local clock with timezone abbreviation
Right: cluster name (tap to switch clusters) and a LINK indicator (tap for network details, long-press to manage WiFi networks)
Spot List (left side)
Each row shows frequency, DX callsign, spotter callsign, time, and the start of the comment
Newest spots arrive at the top
Tap any row to open the full spot detail modal
Spots that match an alert callsign are highlighted in amber
Propagation Panel (right side)
SFI, SN, A-index, K-index gauges with coloured bars
Per-band rows (160M through 6M) with day and night condition indicators (GOOD / FAIR / POOR)
Tap a band row to apply that band as a filter
MODE button: opens the mode/preset filter modal
ALERTS button: opens the alert management modal
Filter Footer (bottom of the propagation panel)
Shows the currently active filter (e.g.
FILTER: 20M) or "no filter"A small CLEAR button removes both the band and mode filters in one tap
Verifying Successful Setup
You'll know the setup was successful when:
The status bar shows your callsign in the accent colour (not "SET CALL")
The clock displays the current local time with timezone abbreviation
The LINK indicator on the right shows
ONLINE(in green)The cluster name appears next to the LINK indicator
Within 10–40 seconds, DX spots start populating the spot list
If the LINK indicator is showing OFFLINE (red) or AP MODE (amber), see Troubleshooting.
Skipping the Wizard (Web Setup)
You don't have to use the on-screen wizard. If you'd rather do everything from a web browser:
Wait for the device to fall into AP mode (about 30–60 seconds after first boot if you haven't touched the wizard)
Or trigger AP mode manually via the serial CLI:
wifi clearfollowed bysaveandrebootConnect to the
DXSpotter Pro Setupopen WiFi networkOpen
http://192.168.4.1/in your browserFill in the configuration form (WiFi, callsign, cluster, filters, alerts)
Click Save
The web form covers everything the wizard does plus extra options that aren't on the touch UI (multiple WiFi credentials, custom clusters, custom filters, alert callsign list, scroll history limit, timezone selector, custom device name).
Serial Monitor Messages
If you have DXSpotter Pro connected to a computer via USB-C, you can monitor the boot process at 115200 baud:
[ota] running version 0.1.0
[net] scanning...
[net] connecting to 'MyHomeWiFi'
[net] online: ip=192.168.1.42 rssi=-55
[time] NTP synced: 16:25:33 BST
[cluster] connecting to dxc.hamserve.uk:7300
[cluster] login complete, streaming
The serial CLI is fully covered in Advanced Features.
What's Next?
Now your DXSpotter Pro is set up and running, you can:
Learn the touch UI in detail in Operation
Customise filters, alerts, custom clusters and timezone in Configuration
Explore the serial CLI and OTA flow in Advanced Features
If something isn't working, jump to Troubleshooting